Sunday, February 14, 2010


How to Paint An Eye part 2


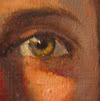
Sometimes, the best way to get your point across is to exaggerate. The image to the right was a demo I did on a student's palette to illustrate how varying values can help to describe the form to give it a more 3 dimensional quality. Let me explain:

1. Think of the eye as a ball. In order to round it out, you need to vary the values from medium dark to light.

2. This example is un-blended. Students tend to over blend everything. Force yourself not to blend. I used a bright Isabey brush for this example because I could get a "chiseled" edge. Overlapping each brush stroke just slightly so my edges would help create the illusion of a transition.

3. When you mix your colors, try to see the how the values vary ever so slightly. My palette was simple: Titanium white, Yellow Ochre, French Vermillion and Black.

4. Later, I could go back in and blend the edges where each value meets or-- I could leave it as is for a different style of painting. In fact, sometimes I have my students work the entire painting without blending. One of my favorite teachers once said to me in her beautiful Italian accent..."think of your painting like a mosaic...and you must describe all the facets of color and value that you see...stroke next to stroke." This has helped me in paintings on a daily basis

Saturday, February 13, 2010


How to paint an Eye


The biggest mistake my students make in our Portrait Painting class when painting an eye, is that they try to illustrate and dissect all the parts of the iris, pupil, etc instead of painting it as a whole. Let me explain:

1. Paint out the entire eye socket with a dark color (Transparent red oxide and ultramarine blue)--think of a skeleton and the cavity of the eye socket.

2. Paint around the eye leaving the dark color as the line of the lid. A simple stroke of a a mid value will describe the eye lid., and continue underneath the eye and surrounding area.

3. Since the eyeball and eye are already almost black, let that be the dark part of the iris. Simply mix the eye color and place your brush on the inside of the cirlce.

4. The whites of the eye are never white! Use a muddy skin tone with either a hint of black or a hint of blue. Start darker than you think. Light usually hits one side of the eye stronger than the other


We just finished our first DVD on painting Portraits.

It's a 4 hour program -live demo and is packed with painting tips and lessons.
I made it out of frustration-my students were not progressing as I thought they should so I decided to put the instruction on DVD. I made them watch it before class and I was shocked at their instant progress. Hmm. "They'll listen to the TV but not me."